Showing posts with label TAoP Part 1. Show all posts

Sunday, 17 October 2010

Exercise 14 Cropping

This is the original photograph that I took on the Long Mynd on a very cold October morning.  I thought it would make a really good subject for the cropping exercise as there is a lot of scope both with foreground and background and also with the depth of field.

Original Image

Crop 1 Screen Print


This is my first crop.  From the results there is a good balance between the sky and the ground and I think it works.  The balance seems nice and there is a real emphasis on where I am and this could be easily identified by the mast, which was one of the points of the shot.

  
Crop 1 Photograph
I like crop 1.  There was far too much foreground on the original shot and this has really made a difference to the end result.  I feel like I could walk up the hill and touch the beaming sun with my hands.

As I look at the photograph I wonder if I could experiment from a width decrease and more foreground?

Crop 2


Photo Crop 2

First I added some more foreground to try and balance the photograph in readiness of the increase.

Screen Print Crop 3


Photograph Crop 3
In the above crops I have increased the foreground and decreased the width of the photograph.   By doing this I have re portioned the photograph but I don't feel it has benefited whatsoever from either of these options.

My fourth crop was quite severe looking for a totally different composition.  Removing the points of location from the photograph I wanted to focus on the sunset rather than the area.


Crop 4

Photograph 4

Like crop 2 & 3 I did not like the end result but it was worth the experiment.  The photograph has lost balance and looks quite ackward and out of sorts.


The last and final adaption was to increase the foreground rather more than the last crop had left.  It was a little too severe and also did not give any detail of the land at all which I think it needed. 

I would have left a little more but the mast would be only partly showing and this would have spoilt the photograph.

The Final Photograph

From the final crop and image the attention is drawn to the beautiful sunrise and the roll cloud on the hill.  Moments after the photograph was taken the sun rose too high and the lovely combination of cloud and land was gone for another day.  I really like this final crop and have kept it as my best image of the day.


Conclusion

This exercise has been very rewarding.  I like both crop 1 and the final photograph for the different reasons that I have explained.  My favourite personal choice though is the last image. 

The process of this exercise has made me think more clearly about the detail that I am looking for in the photograph.  I went to the Long Mynd on a very early morning and in all sincerity I was just looking for the experience.  I went to see the sunset but did not realise the actual beauty of the landscape as I had never visited the area before. 

I see this visit and exercise as a trial run for many other experiences just like this but with more knowledge about what I want and what is there to be captured.


Exercise 11 Balance


To me every picture should tell a story therefore balance is an integral part of that story.  Emotion reigns for me in photographs that is why I love to do people pictures, especially those when the subject has no idea the picture is being taken.
Photograph 1
Photo 1 Balance Diagram
The above photograph was taken at the Brighton Burn-up 2010. 
It is heavily weighted nearest the camera so the eye is drawn to the patches on the back of the jackets.  The further away from the camera where the balance is less great a friend waits for the group to catch up who are clearly just ambling along and appeared to be in no great hurry as I watched them walk by.
The purpose of the photograph was to show old friends together who perhaps in their younger days rode very large motorbikes and no doubt a force to be reckoned with.  Now time has passed and they have attended the Burn-up (no doubt still on motorbikes) to reminisce and talk about old times.
Photograph 2
Balance Diagram 2
The above is again heavily weighted nearest the camera.  The composition in the photograph seems to be the opposite to what I read about the largest items being furthest away.  I took it with my wide angle lens.  I wanted my scooter to be the focus of the attention, taking up the largest part of the frame.  I also wanted to illustrate where I was and the other scooters around me so getting the experience of the whole Brighton vibe.
Photograph 3
Balance Diagram 3
This photograph was taken at our village fete.
It is a sister and brother, with the brother quite obviously adored.  The girls expression is loving and also admiring.  She is focused heavily on him as he expresses himself. 
The balance is slightly in favour of the sister but as the brother is the actual topic of the admiration he too has a large presence in the frame. 
This is an adorable photograph that I think stands for everything I love about photography.
Conclusion
This exercise has really opened my eyes to what I achieve with my photographs without realising it.  However, it has also highlighted lots of areas that I can improve up.  Another great basis to underpin the rest of the course. 
I shall however return to this subject further down the course and see how my understanding has changed as it is far from complete.

Project Cropping and Extending

Extending

I want to show a comparison here as my new camera has a panoramic facility on it.  So I would like to do the same scene with both stitching and load up what the camera actually takes.

21/11/2010

OK I have finally been out and completed this exercise today and it has proved very interesting. 

This first shot has been done using the panoramic facility on my new camera.  Now this is the first time I have used this function and it is very cold today. 


I am not sure if I can change the dimensions on the panoramic setting but this is disappointing to say the least.  The hills have been chopped away along with the top of the church tower.  However as I say this is the first time I have used this facility and I will not be too hard until I have experimented further.  For the purpose of the project it did its job.

The second part of the exercise for me was to take three separate photographs and then stitch them together.


Above are the three photographs that I used to make my panoramic below.  The process was relatively simple and the process extremely easy with Photo shop CS5.

The end result is far better than the one produced on my camera.  I have cropped the edges to trim and fine tune but all in all the process worked well.


Conclusion

The exercise has been particularly interesting for what can be achieved when you look at the bigger picture. 

The process still made me take my time but it also gave me such a large scope for the composition. 

This is the village in which I live.  Quintessencely English and very beautiful.  It's quite a small hamlet will lots of greenery and a lovely church.  The Malvern hills in the background have been captured and I think it achieves the aim of a nice post card picture shot.

Saturday, 16 October 2010

Exercise 13 Vertical & Horiztontal Frames

The slide show below depicts the photographs that I took while experimenting with vertical and horizontal frames to accomplish this exercise. 

I have taken lots of time over this as I wanted to sort out a display facility via Lightroom that would make life alot easier too display multiple photographs without the static format that is found in Picasa. 

Please click on each photograph for my critique of how I feel they worked when framed in the two different dimensions requested by the exercise. 

Totally the wrong white balance used on the day and I think that has had a real effect on the end photographs, but for the object of the exercise I think they work remarkably well.


My next objective is to show the exposure detail, but that's another story........

As you can see all the photographs in the slideshow were taken at the National Arboretum Alewas.  Some of the photographs work vertically and horizontally but in all cases they gave a totally different dimension to the shot. 

Conclusions

When I first commenced with this exercise a good few months ago I found that a composition I did at out allotment worked really well. 

I feel it is a really good example of how changing the frame can work in your favour as well as giving the photograph another feel and dimension.


Horizontal Frame
Vertical Frame


Both the above photographs were taken on wide Angle lens.  Taken from the same position at low level.  

We can see that the horizontal framing shows much more of the surrounding and gives you a good sample of everything involved in the allotment and also how busy it was at that time of the year on a beautiful early September day.

The vertical frame brings many other elements into play even though it includes less in the frame horizontally.  There is more development as the photograph changes angle.  A branch above (which I had not in fact actually even seen) draws you in like you are climbing through from another area at ground level. It kind of makes you feel like you are a little mole or rabbit popping up for a quick look around, whereas the horizontal would be my view from crouching level.

Each photograph tells the same story just from a different angle.

Great exercise on awareness, pre-visualisation and flexibility in photograph opportunities..........one phrase for the written notebook and reminder throughout the course.   

Wednesday, 13 October 2010

Exercise 12 Positioning the Horizon

These photographs were again taken on Long Mynd

The first image below shows a much higher horizon which takes up 2/3rds of the photograph.  The beauty of cloud and the sky make the shot interesting and takes your mind over the hill tops and into the distance. There was a significant amount of roll cloud on the day but sadly this is not really captured in the shot.  But the purpose of the trip was the sunrise and I this is why the placement of the horizon works well here.

Image 1

Image 2 is far more balanced though as the exercise brief suggests it is a little static.  The horizon is set centrally and the photograph a tad boring.  However the potential is there and I feel the third image harnesses the elements of a much better landscape composition.

Image 2

I took the third image at a much lower level making the foreground more prominent with a switch from 2/3rds sky to 2/3rds foreground.  The sky is no longer the only focus of attention.  Now the land also draws you further into the photograph. 

As I moved further out some more detail was captured in the foreground with the ground level foliage leading the eye through the range of hills and again off into the distance.  To me it looks like a great walking area and a good depiction of it for any visitor.

Image 3

The final image contains mostly foreground.  I am not keen on the image as I feel there is too much foreground now.  The drama has gone from the sky and the undulation of the ground has been lost in both distance and with the confusion of so many points.  Although the land is beautiful the lighting and the lens has not captured it well enough to be the focal point of the photograph, and in that and the other problems the image fails as a reference for the day.

Image 4

Conclusion

An amazing exercise to show what I was attempting on my photographs from the day.  I thought about what caught my eye and that determined where I placed the horizon.  The purpose of the photograph initially was to collect an image of the sunrise, but as daylight broke it became apparent how beautiful the hills on and around Long Mynd were and from that my compositions thoughts changed. 

Having never visited the spot before it became my mission to focus on two main points for the composition and to achieve a balance between them whilst also delivering a result on this exercise. 

The impact of horizon placement did have a huge affect on the photographs I took on the day.  My personal favourite is image 3, it totally depicts the great day I had on Long Mynd, along with another lesson learnt.


Sunday, 10 October 2010

Exercise 9 Focal Lengths

This set of photographs was taken with my Tamron 70-300mm Lens.  The tree is a nature reserve in the village I live.  I have oftern looked at it and thought I wonder who lives there?


Tuesday, 28 September 2010

Exercise 8 A sequence of Composition

These photographs were taken at the Urban Village Vintage sale.  I knew it would be busy with lots of well dressed teenagers who have their own style and very good a lot of it is too.  So with this great opportunity I set off to get amongst it. 

Shot 1

This the my first shot after I noticed the initial two girls.  On this first photograph I only have the two initial subjects and a thought process which would just involve the shot of those two girls.


Shot 2
On photograph two I am waiting for the girls to settle and move round so I can get them more central. 

Though I tried not to make it obvious it was clear I had been spotted, big chessy grin.  My aim was now to try and get the group that is forming relaxed enough that I could get a really natural shot.  From shot 2 - 3 the compostion of the photograph has changed and my subject now larger than first anticipated

Shot 3

As I am moving around I attempt to get my colour and focus correct and feel that a change of lens is required.

I change my lens from 70-300mm to my 35-70mm from shot 4 to gain a better focal length with a smaller aperture as it is quite a dark area.  By doing this I feel less imposing on the subjects due to my close proximity than I did with my larger lens.  Took me a while  to frame the shot and adjust the lighting with the correct shutter speed but then this is why I am here.


Shot 4

Shot 5


Shot 6


Shot 7
There was lots of movement and repositioning and it was not until I returned home and viewed the photographs side by side that I made my choice from those I had taken.


Final finished photo for my street photography project.  Still not exactly how I would like it to be, but then I do have a lot to learn.......


Final Photograph

I have learnt from this more about the focal length, its limitations and requirements for subject placement.  Where on many other occasions I would have drawn back to get a better position I have this time thought more about the changing the lens more frequently. 

The problem that I have come across has of course been inexperience and quickness.  Luckily these young people thought I was from a magazine or something are were quite happy to sit around while I sorted myself out.


.

Monday, 27 September 2010

Exercise 7 Object in Different Positions in the Frame.


Objective not achieved with these photographs,  not enough knowledge gained from other photographs in the same shoot.  More difficult than it looks to be honest.  Back to the drawing board again!

3 December 2010

I took some photographs that were originally meant for another exercise but as I looked at them I could see the benefit of using them here.


Sunday, 26 September 2010

Exercise 6 Fitting the frame to the subject

   
Image 1

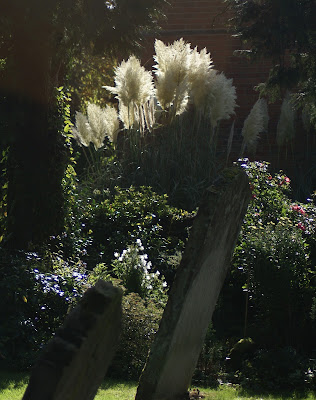
Image 1 to show the entire subject in the view finder as I would have photographed it normally.  I feel that the pampas grass is a beautiful backdrop to an old area of a graveyard that itself is shaded.  The purpose of the photograph was to show the contrast of the old stone that shows life completed against the ever-growing and regenerating pampas grass and beautiful flowers.

Image 2

Image 2 is my subject which I have tightly fitted to the frame.  There is no light on this image and it looks dark.  It looks very dull and not at all interesting not the effect that  had in mind.  Luckily the sun moved round and the effect I wanted suddenly came to light.....no pun intended!


Image 3 is just a very small part of the subject and when you look at it means nothing to the overall photograph, but is in itself a photograph completely different to what I had in mind at the beginning.  The image could be utilised for a backgound for something like a baby shot or to bring out the sharpness of a less impressive subject and I will keep it for that.

Image 3


Image 4 is the placement of the subject within the context of the photograph.  The surroundings are quite dark and bleak but the sun shining through the pampas grass shines a light and a pure beam that draws the eye along the stones and up to the grass itself.  It reminds me a little of an angel in a way.  One that shines down and protects those who sleep beneath it.  I rather like that concept.


Image 4
 The following crops done for alternative possibilities to image 4


The image is cropped to draw far more attention to the headstones themselves with the pampas grass which becomes purely background and so no more has the illusion of divine light.


The image above have been cropped for composition to include the gate, giving an entrance to the frame.  This makes a much better composition as the placement of subjects appear more structured with a much bigger picture.


The two images above are the two crops it took for the third and final crop as shown below.

I like this crop.  It totally alters the composition of the photograph.  The pampas grass is again the main subject but with the gravestone having less of a bearing on the photograph.  My eye is instead drawn to the light coming through the pampas and the pure beauty of the whites.

The gravestone now appears straight with the pampas grass at an angle. 


Conclusion

This exercise has given me a very good foundation to understanding the composition of a photograph.  It has made me re look at how I am taking the photograph and the full potential of a photograph within a photograph, thus opening my eyes to the massive opportunities in each composition.


Blog Archive